Integrating PowerUp into Your Deployments – Step By Step

AKA Deploying a fully working NerdDinner website in 15 minutes and 50 lines of code

The goal of this post is to show, one straightforward step at a time, how you can integrate PowerUp into your solution.

We will start with downloading the “NerdDinner” MVC sample, and finish by having two completely independent and full working versions of the site on your local machine.

Don’t worry if this looks long – it is just because I haven’t left out a single detail. Also, the thing about PowerUp is that it is very layered – the deployment we are working on will just become gradually more sophisticated. You can actually stop at any step and you will have still produced something useful.

Here is some links to other parts of the page so you know where you are up to:

You can get everything going just from the steps below. If you prefer to have a fully working copy to look at, download the final solution as a zip file here (which is from the GitHub repo here).

Step Zero – Prerequisites

Remember to check you have the required prerequisites. Even better, make sure the QuickStart build runs fine. If it doesn’t, its unlikely that this step by step guide will work.

Step One – Download NerdDinner

Download the NerdDinner Codeplex Zip File and extract this anywhere on your machine. It should have the following contents.

Step Two – Download and copy PowerUp

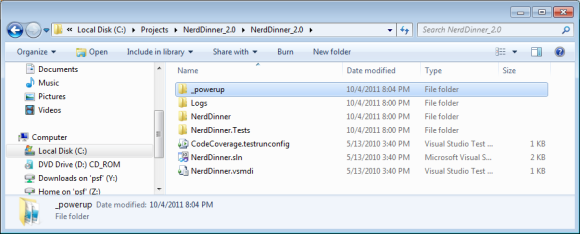
Download PowerUp and place the contents of the contained _powerup folder into the root folder of NerdDinner. The end result will look like this:

Step Three – Create your nant build file

At the root of NerdDinner, create a new file called main.build. Within this file, add the following code:

<project default="build-package-common">
	<include buildfile="_powerup\common.build" />
	<property name="solution.name" value="NerdDinner" />
	<target name="package-project">
	</target>
</project>

In short, this includes a reference to the common build file, tells PowerUp the name of the solution file, and creates a (stub package-project) target.

Step Four – Run your first build

Open a commandline prompt at the root of NerdDinner. Within this prompt, run the following:

_powerup\nant\bin\nant

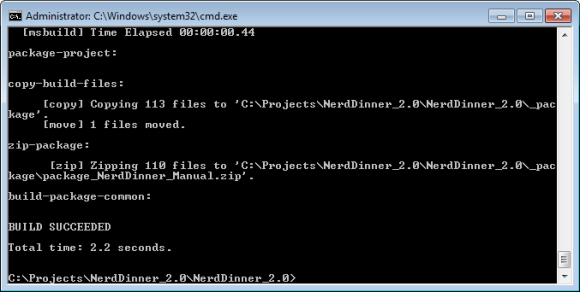
This will run nant on your main.build file. The output will look like:

To make this easy to run again, create a batch file (build_package_nant.bat) with the following code:

_powerup\nant\bin\nant
pause

Step Five – Alter the build to include the compiled output

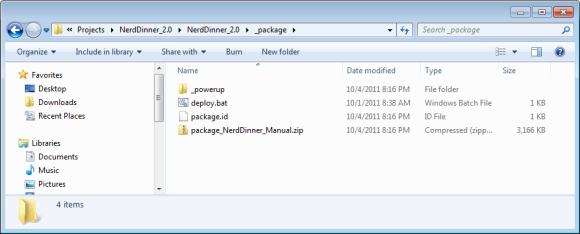
As the build currently stands, PowerUp is happily compiling the NerdDinner solution, and creating a basic package folder.

You might notice that the output of the NerdDinner solution isn’t in there – we need to actually tell PowerUp what to include for this to happen.

To make this happen, alter main.build to include these lines:

<project default="build-package-common">
	<include buildfile="_powerup\common.build" />

	<property name="solution.name" value="NerdDinner" />

	<target name="package-project">
		<copy todir="${package.dir}\NerdDinnerWebsite" overwrite="true" flatten="false" includeemptydirs="true">
			<fileset basedir="${solution.dir}\NerdDinner">
				<include name="**"/>
				<exclude name="**\*.cs"/>
				<exclude name="**\*.csproj"/>
				<exclude name="**\*.user"/>
				<exclude name="obj\**"/>
				<exclude name="lib\**"/>
			</fileset>
		</copy>
	</target>
</project>

What we have added is a basic copy target to copy all the necessary files from NerdDinner into the package.

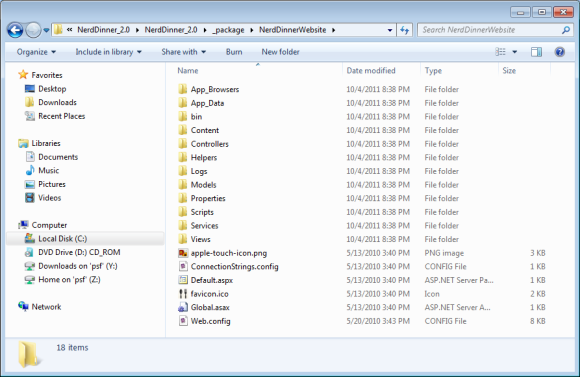
Run the build again, and you should see NerdDinnerWebsite appear inside the package folder.

With that folder having these contents:

Step Six – Start by deploying the files

You might recall that PowerUp is roughly split into two steps – building a package, and deploying that package. Up until now, we have been working on the packaging. Its time to start deploying.

To get this under way, create a file called deploy.ps1 in the root of the folder. Start with the contents:

include .\_powerup\commontasks.ps1

task deploy {
	import-module powerupfilesystem

	$packageFolder = get-location
	copy-mirroreddirectory $packageFolder\nerddinnerwebsite c:\sites\nerddinner
}

This (psake) file first dot includes the common tasks (to hook up with some useful defaults), then copies the contents of the NerdDinnerWebsite folder to c:\sites\nerddinner.

To execute this, open a command prompt in the _package directory and run:

deploy local

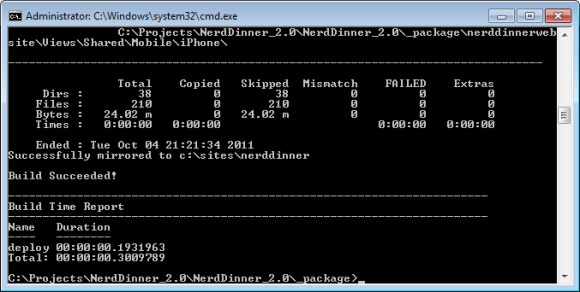
This will produce the following output:

And if you look in c:\sites\nerddinner, you will now see the contents of the NerdDinnerWebsite folder from the package.

To make later deployments easier, create a new file in the root called build_package_nant_deploy_local.bat with the contents:

_powerup\nant\bin\nant
cd _package
call deploy local
cd ..
pause

Step Seven – Create a website

During this step we will be altering the deployment script to automatically create a website pointing to the website folder. Alter deploy.ps1 to have the following contents:

include .\_powerup\commontasks.ps1

task deploy {
	import-module powerupfilesystem
	import-module powerupweb

	$packageFolder = get-location
	copy-mirroreddirectory $packageFolder\nerddinnerwebsite c:\sites\nerddinner

	set-webapppool "NerdDinner" "Integrated" "v4.0"
	set-website "NerdDinner" "NerdDinner" "c:\sites\nerddinner" "" "http" "*" 20001
}

Notice the extra lines at the bottom where we create an appool, and also create a website.

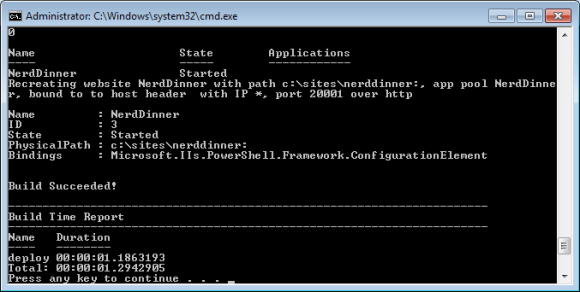
Rerun the build and deployment (build_package_nant_deploy_local.bat)

Thats the output of a successful website deployment!

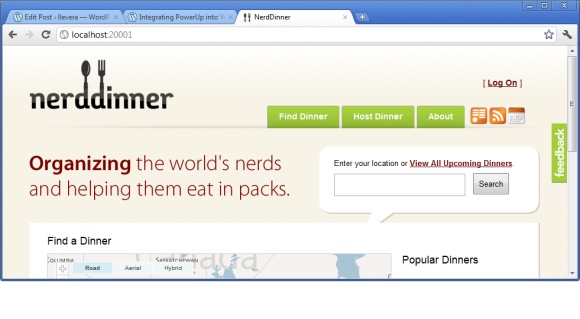
Now browse to http://localhost:20001 to see the NerdDinner website in action.

Step Eight – Introducing deployment settings

At first look, you might think we have finished the job. We have a fully working website, after all. The problem is this package is only going to work on one environment. Take a look again at this snippet from deploy.ps1:

copy-mirroreddirectory $packageFolder\nerddinnerwebsite c:\sites\nerddinner
set-webapppool "NerdDinner" "Integrated" "v4.0"
set-website "NerdDinner" "NerdDinner" "c:\sites\nerddinner" "" "http" "*" 20001

This screams “hard coded to hell”. Its all very well deploying to c:\sites onto your local machine. But what about staging or live? They might have the web folder in e:\webroot. Also if you want to have two branches of this code base on the test server, how will you ensure they each have their own website? Thats where deployment profiles and settings come in.

Our first step in this direction is to introduce a settings file. Create the file settings.txt in the root, with the contents:

local
	website.name			NerdDinner
	web.root			c:\sites
	http.port			20001

Step Nine – Using the settings within deploy.ps1

Now you have settings, you can use these within your deploy.ps1. How? Just refer to them (by key) like you would any Powershell variable. So in this case, change your deploy.ps1 file to:

include .\_powerup\commontasks.ps1

task deploy {
	import-module powerupfilesystem
	import-module powerupweb

	$packageFolder = get-location
	copy-mirroreddirectory $packageFolder\nerddinnerwebsite ${web.root}\${website.name}

	set-webapppool ${website.name} "Integrated" "v4.0"
	set-website ${website.name} ${website.name} ${web.root}\${website.name} "" "http" "*" ${http.port}
}

Notice how this is almost the same script as from step seven. All that has changed is that we have replaced the hard coded file paths and website parameters with the setting names.

Run build_package_nant_deploy_local.bat and notice the website deploys again and still runs exactly as before.

Step Ten – Deploying to another environment

Now we have settings and a parameterised build file, we can easily deploy to other environments by simply adding additional deployment profiles. Normally this would target another server (test, staging, live etc), but in this case I’m going to assume you don’t have many other machines lying around so we are going to have to “fake it” by deploying to another location on your machine.

Start by changing the settings.txt file to:

default
	web.root	c:\sites

local
	website.name	NerdDinner
	http.port	20001

fakelive
	website.name	NerdDinnerFakeLive
	http.port	20002

This has created the new deployment profile, “fakelive”. Also notice the “default profile” – this is a special, reserved, profile that all others inherit from (so common settings don’t have to be repeated).

Now to deploy this new profile, all you need to do is rebuild the package and deploy to “fakelive”. The following batch file will do this:

_powerup\nant\bin\nant
cd _package
call deploy fakelive
cd ..
pause

This is absolutely identical to previous deployments except we have change the argument to “deploy” from “local” to “fakelive”.

Save this to build_package_nant_deploy_fakelive.bat in the root and run it. You will now have a second copy of the site, serving from http://localhost:20002.

This demonstrates the core tenet of PowerUp – the ability to deploy to any number of environments from a single package.

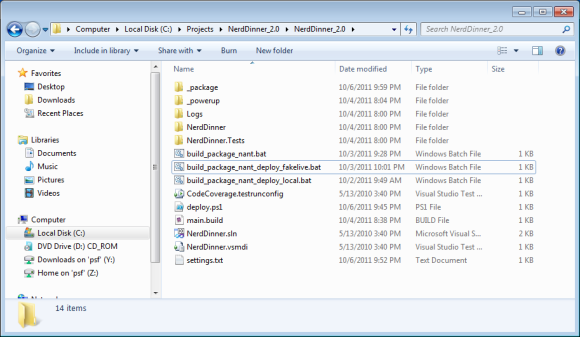
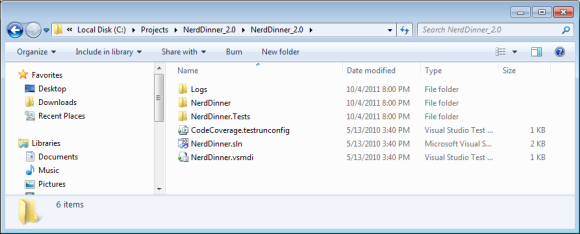
As a double check, your solution folder should now look like this:

Step Eleven – Introducing file templating (usually for configs)

Hopefully the above shows the value of being able to use settings with your build script. There is another very common case where deployments need to vary by environment. That is the difference in the contents of the files you are deploying. This is almost always config files, such as web.config or app.config.

There are various common existing techniques to deal with this issue, ranging from having multiple config files (web.config.staging, web.config.live) and swapping them around at deploy time, or using Visual Studio Config Transformations. PowerUp (by default) chooses a different technique – that of file templating, a ndusing the same settings file used by deploy.ps1 to substitute in the correct values at deploy time. We believe this centralization of settings holds massive advantages.

I’m going to show this in action by templating NerdDinner’s connectionstrings.config.

If you look at this file (I won’t paste it here, as its quite long), you will see 3 connection strings. At the moment they all bind to to |DataDirectory|, which looks in App_Data for the database files (NerdDinner.mdf etc).

Lets say, for the sake of argument, we want these files to exist somewhere else on disk, and we want this location to be different on each environment.

To achieve this, we are going to template the database file folder in connectionstrings.config and create a deployment profile setting to make this different for local and fakelive.

Step Twelve – Create a template for connectionstrings.config

Starting at the root folder:

  • Create a new folder called _templates.
  • Within that folder, create another folder called NerdDinnerWesbite
  • Copy into that folder the connectionstrings.config file from NerdDinner website
The end result should look something like this:

Open up connectionstrings.config and replace |DataDirectory| with “${database.folder}\”.  Doing this introduces the placeholders to be replaced during deployment. For example, the first setting should read:

<add name=”ApplicationServices” connectionString=”data source=.\SQLEXPRESS;Integrated Security=SSPI;AttachDBFilename=${database.folder}\aspnetdb.mdf;User Instance=true” providerName=”System.Data.SqlClient”/>

Step Thirteen – Create the new setting for database.folder

Change settings.txt to now include the setting database.folder, ie:

default
	web.root		c:\sites
	database.folder		c:\databases\${website.name}

local
	website.name		NerdDinner
	http.port		20001

fakelive
	website.name		NerdDinnerFakeLive
	http.port		20002

Also notice how settings can reference each-other (c:\databases\${website.name} – a useful trick to keep the settings file compact.

Step Fourteen – Witness connectionstring.config being substituted during deployment

Run build_package_nant_deploy_local.bat to deploy another package.

Open C:\sites\NerdDinner\connectionstring.config – you should see that the placeholder for ${database.folder} has been replaced with “c:\databases\NerdDinner”.

Now run build_package_nant_deploy_fakelive.bat, and open C:\sites\NerdDinnerFakeLive\connectionstring.config. In this deployment, the value is “c:\databases\NerdDinnerFakeLive” instead.

This is config substitution in action, and hopefully shows how any part of the config file can be templated, handling all the common cases of connection strings, webservice urls etc.

Step Fifteen – Change main.build and deploy.ps1 to deploy the database files

To get the NerdDinner database files into these directories, we are going to need to firstly change the packaging to copy them from their current location in App_Data, and then change the deployment to copy them to their folders under c:\databases.

So first, change main.build to package the databases from app_data, ie:

<project default="build-package-common">
	<include buildfile="_powerup\common.build" />

	<property name="solution.name" value="NerdDinner" />

	<target name="package-project">
		<copy todir="${package.dir}\NerdDinnerDatabases" overwrite="true" flatten="false" includeemptydirs="true">
			<fileset basedir="${solution.dir}\NerdDinner\app_data">
				<include name="**"/>
			</fileset>
		</copy>
		<copy todir="${package.dir}\NerdDinnerWebsite" overwrite="true" flatten="false" includeemptydirs="true">
			<fileset basedir="${solution.dir}\NerdDinner">
				<include name="**"/>
				<exclude name="**\*.cs"/>
				<exclude name="**\*.csproj"/>
				<exclude name="**\*.user"/>
				<exclude name="obj\**"/>
				<exclude name="lib\**"/>
			</fileset>
		</copy>
	</target>
</project>

Then change deploy.ps1 to read:

include .\_powerup\commontasks.ps1

task deploy {
	import-module powerupfilesystem
	import-module powerupweb

	$packageFolder = get-location
	copy-mirroreddirectory $packageFolder\nerddinnerwebsite ${web.root}\${website.name}

	if (!(Test-Path ${database.folder}))
	{
		copy-mirroreddirectory $packageFolder\NerdDinnerDatabases ${database.folder}
	}

	set-webapppool ${website.name} "Integrated" "v4.0"
	set-website ${website.name} ${website.name} ${web.root}\${website.name} "" "http" "*" ${http.port}
}

The relevant addition is to the copying of the NerdDinnerDatabases folder from the package to the database directory (if it doesn’t already exist, to prevent overwriting).

Running build_package_nant_deploy_local.bat and build_package_nant_deploy_fakelive.bat should now distribute those database files to c:\databases\nerdinner and c:\databases\nerdinnerlive respectively.

Browser http://localhost:20001 and http://localhost:20002 to see the sites still ticking along.

If you perform a few functions (register an account etc), you will see they are running off independent databases.

Step Sixteen – Why you would want to execute parts of the deployment on other machines

Again, you might be excused for thinking we are done. The deployment and config files are now good for any number of environments.

But have a quick think. What would happen if wanted to a) run this script from a Continuous Integration server deploying to a test server or b) deploy files or create websites on more than one server (for example a load balanced environment).

At the moment, our deploy.ps1 has the severe restriction that it all runs on the same machine. In the CI case, this means that if this script was run, it would create the websites on the CI server (or agent). Hardly ideal!

But don’t worry, the solution is quite simple.

Step Seventeen – Run web-deploy remotely

Start by altering deploy.ps1 as follows:

include .\_powerup\commontasks.ps1

task deploy {
	run web-deploy ${web.servers}
}

task web-deploy {
	import-module powerupfilesystem
	import-module powerupweb

	$packageFolder = get-location
	copy-mirroreddirectory $packageFolder\nerddinnerwebsite ${web.root}\${website.name}

	if (!(Test-Path ${database.folder}))
	{
		copy-mirroreddirectory $packageFolder\NerdDinnerDatabases ${database.folder}
	}

	set-webapppool ${website.name} "Integrated" "v4.0"
	set-website ${website.name} ${website.name} ${web.root}\${website.name} "" "http" "*" ${http.port}
}

The change is fairly subtle: We have moved most of the script from the default “deploy” task to “web-deploy”, and changed “deploy” to call web-deploy.

The key here is the “run” command. This instructs PowerUp to run the web-deploy remotely on another machine.

To get this going, we need to add a few more things. First of all, we change the setting.txt to read:

default
	web.root		c:\sites
	database.folder		c:\databases\${website.name}

local
	web.servers		localmachine
	website.name		NerdDinner
	http.port		20001

fakelive
	web.servers		localmachine
	website.name		NerdDinnerFakeLive
	http.port		20002

The important change here is the declaring that (for both deployment profiles) the web server is the server “local”.

Next we need a new file, called servers.txt to describe some necessary details about “local”.

So, create servers.txt in the root, with the contents:

localmachine
	server.name			localhost
	remote.temp.working.folder	\\${server.name}\c$\packages
	local.temp.working.folder	c:\packages

Note that (unlike setting.txt, which has no rules about which keys you create), servers.txt must have all three settings (with those exact names) for each server. These settings simply let PowerUp know what the UNC path is for the server, and the folder where it can copy your package and run deployment scripts from.

Now that is all in place, run build_package_nant_deploy_local.bat again.

Notice how the output now changes:

At the key moment (the remote call to web-deploy), PowerUp automatically copies your package to the remote working folder, then starts the deployment again for the task web-deploy.

This can be done at any point in the script, to any server. You can even call out remotely when you are already remote (there are a lot more details to this that I will cover in later posts.)

Summary

Well there we have it. Hopefully that took way longer for me to write than it took for you to run through!

If you reflect on what has been done to make this all work, it might be quite startling how little it took. All we did to get this website buildable and deployable to multiple environments was to:

  • Copy the _powerup folder
  • Create main.build (23 lines)
  • Create settings.txt (13 lines)
  • Create deploy.ps1 (21 lines)
  • Create servers.txt (4 lines)
  • Template connectionstrings.config (won’t count this)
  • Create a few batch files (won’t count this either)
So thats 51 lines of code (ish). Close.
Remember that the zip file of this solution is available here.

Other Posts

Next (How To Use PowerUp in Your Deployments)

Previous (PowerUp Quickstart – A Rundown)

The PowerUp Series

PowerUp Quickstart – A Rundown

Lets assume you have run the PowerUp  Quickstart. Hopefully you are wondering – what actually happened during all that?

Have a look at the contents of build_package_nant_deploy_local.bat. You should see just a few DOS commands:

_powerup\nant\bin\nant
cd _package
call deploy local
cd ..
pause

Broadly, two things happen here. First, the solution is built into a package (the call to nant). Then that package is deployed to the local machine (deploy local). I will go over these two steps below.

Building the package (with Nant)

_powerup\nant\bin\nant

This step is a completely normal, run of the mill, nothing-special-at-all nant build. (Note – don’t like Nant? Don’t worry, you can use MSBuild as well – have a look at build_package_msbuild_deploy_local.bat for the exact equivalent of this in MSBuild)

Solution Nant File

For this solution (SampleWebsite), the nant build file (main.build) looks like this:

<project default="build-package-common">
	<include buildfile="_powerup\common.build" />

	<property name="solution.name" value="SampleSolution" />

	<target name="package-project">
		<copy todir="${package.dir}\SimpleWebsite" overwrite="true" flatten="false" includeemptydirs="true">
			<fileset basedir="${solution.dir}\SimpleWebsite">
				<include name="**.aspx"/>
				<include name="**.css"/>
				<include name="**.js"/>
				<include name="**.master"/>
				<include name="bin/**"/>
			</fileset>
		</copy>
	</target>
</project>

This nant file does 3 things:

  1. Includes a reference to the PowerUp common nant file (common.build)
  2. Creates a property to set the name of the Solution file (in this case SampleSolution)
  3. States what within the website folder is required to be in the package (in this case all the aspx, css, js, master files and bin folder)

Common PowerUp Nant File

Everything else is handled by the _powerup/common.build. I won’t go into a lot of detail in this blog post about what it does – feel free to have a look yourself.
But in general, it runs through the following tasks:
<target name="build-package-common" depends="clean compile-solution package-project copy-build-files zip-package" />

That is, it firstly cleans (both the package folder and the solution bin folders), compiles the solution, calls package-project to get the solution specific files (look back at main.build to find this target), copies the powerup folder (and some other required files) into the package and then zips the whole lot up.

Package Contents

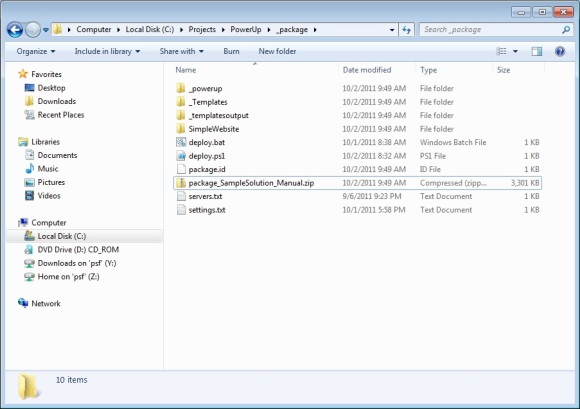
The result of all this is output to the folder _package, found under the root of your solution root folder. The contents look like this:

I won’t explain in detail all the items here just yet. But generally the contents of this are:

  1. Any folder created by the package-project target in main.build. In this case, it is SampleSolution, but this may be up to many dozens of folders for an extremely large solution.
  2. The _powerup folder, which contains all the PowerUp scripts and dlls required during deployment.
  3. The _templates folder, which contains templates config files for substitution during deployment (to be explained further later)
  4. The solution specific files settings.txt, servers.txt and deploy.ps1. These are the settings and deployment scripts that guide the specifics of each deployment (again, this will be explained in full later)
  5. The package identification file package.id, used to efficiently distribute this packages across multiple servers.

Deploying the Package

call deploy local

The above package is designed to be environment neutral. That is, it is designed to be NOT built with a particular deployment environment in mind (local, test, staging, live etc).

What this means is that during deployment, you must specify which environment you are deploying to in this particular instance. Technically, PowerUp refers to this as the deployment profile.

So by calling “deploy local” we are instructing PowerUp to deploy this package according to the deployment profile “local”. What does this actually do then?

Deploy.ps1 (the deployment file)

This is the (psake) file where, for each solution, you detail what should happen during a deployment. In the case of SimpleWebsite, the deployment file looks like this:

include .\_powerup\commontasks.ps1

task deploy {
	run web-deploy ${web.servers}
}

task web-deploy  {
	import-module powerupfilesystem
	import-module powerupweb

	$packageFolder = get-location
	copy-mirroreddirectory $packageFolder\simplewebsite ${deployment.root}\${website.name} 

	set-webapppool ${website.name} "Integrated" "v4.0"
	set-website ${website.name} ${website.name} ${deployment.root}\${website.name} "" "http" "*" ${http.port}
}

We’ll start with the web-deploy task. In here we:

  1. Instruct the deployment to copy the contents of the “SimpleWebsite” to the required folder of the destination server.
  2. Create an an apppool.
  3. State we want a website of a certain name with this apppool, bound to http, all IP addresses and a given port

All quite simple then. But there are probably already some questions in your head. Firstly – where do the properties (${website.name}, ${http.port} etc) come from? Secondly, where do the cmdlets (copy-mirroreddirectory etc) come from? Thirdly, what is the line “run web-deploy ${web.servers}” for?

I will take these all in turn.

Settings.txt (the configuration settings)

This file holds all the information about the differences between each environment you wish to deploy to. Lets have a look:

default
	website.name			SimpleWebsite
	deployment.root			${root.drive}\sites
	http.port			80
	https.port			443

local
	web.servers			localhost
	root.drive			c:
	http.port			9000
	https.port			9001
	example.setting			local

staging
	web.servers			stagingweb
	root.drive			e:
	example.setting			staging

live
	web.servers			liveweb1;liveweb2
	root.drive			g:
	example.setting			live

See the setting names? That is what we are referring to within the script. By having the setting values separate out like this, this allows a single deploy.ps1 file work just fine for many different environments. There are some subtleties here which I won’t explain fully (such as how the default profile works, referencing other setting from settings etc), but hopefully the basics are clear.

Built in PowerUp Cmdlets

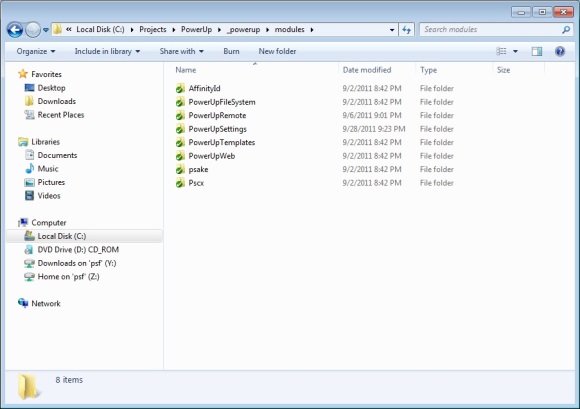
During the script we refer to a number of PowerUp cmdlets, such as copy-mirroreddirectory. These cmdlets live in the _powerup\modules folder, as so:

To use each of these, the script simple calls import-module for the modules required. By default, PowerUp has placed this entire directory in the Powershell modules path. Of course, you can include any other non-Powerup modules just like you would in any Powershell script.

Remote Tasks/servers.txt

Turn your attention now to following lines in deploy.ps1:

task deploy {
	run web-deploy ${web.servers}
}

As you might expect, this line states “run the task web-deploy on the machine web.servers”. Why would we want this?

You may not immediately notice why we would need to do this. Here are a few reasons why you might want to execute tasks on machines other than the one you start the script on:

  • You are executing the script on a CI server, and want bits of the deployment to run on your test server. That is, you want the website created on your test server, not the CI server itself!
  • You have 3 web servers on Live, and you want to deploy to all of them without running the script 3 times
  • You need to install something on the database server
To support this, you need to tell PowerUp some basic information about these servers. That is what the file servers.txt is for:
default
	temp.root.drive			c
	remote.temp.working.folder	\\${server.name}\${temp.root.drive}$\packages
	local.temp.working.folder	${temp.root.drive}:\packages

localhost
	server.name			localhost

stagingweb
	server.name			staging.exampledomain

liveweb1
	server.name			live1.exampledomain

liveweb2
	server.name			live2.exampledomain
So for each server, you need to say
  1. What the network name of the server is
  2. Which folder PowerUp can copy the package to and run scripts from (both the external and local path).
An aside on remote execution… PowerUp by default uses psexec to execute remote tasks. This can be changed to powershell remoting (per task call, per server or for all tasks on all servers). Look in the PowerUpRemoting module for details.

File (usually config Subsitutions)

In .Net at least, config files need to be different in some way on each environment. Maybe the db connection string has to be different, or the url of an external web server.

PowerUp deals with this through file templating, combined with the settings system already described above.

Have a look at _templates\SimpleWebsite\web.config:

<?xml version="1.0"?>
<configuration>
  <appSettings>
    <add key="EnvironmentName" value="${example.setting}"/>
  </appSettings>
</configuration>

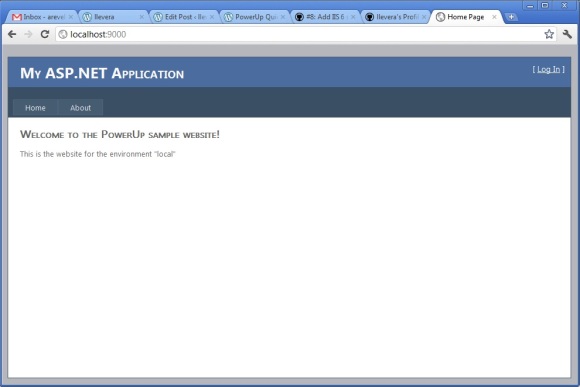
See the placeholder ${example.setting}? That will be substituted (during deployment) for the specific value for the deployment profile from settings.txt. In the case of local, this is simply “local”. You can see the effect of this at http://localhost:9000, in the sentence “This is the website for the environment “local”.

The rules for this substitution scheme is simple: any files you place in _templates will be processed such that any occurances of a setting will be replaced, and the resulting file copied over the top of the package before it deploys.

Summary

So there are the basics of how PowerUp builds packages and then deploys them. Hopefully that is enough to understand the Quickstart deployment, and even getting started on your own.

Extensibility note: What I have described here is the default behaviour of PowerUp. None of this is mandatory. It is possible you might want to store your settings a different way (maybe in a database), execute remote tasks a different way, or deal with web.config files in a different way. All of this is supported, and will be detailed in later blog posts.

Other Posts

Next (How To Know If PowerUp is Right For You)

Previous (PowerUp Quickstart)

The PowerUp Series

PowerUp Quickstart

This post will be quick demo of what PowerUp can do. It will show the build and deployment of a simple website.

Step Zero – Get the Prerequisites

I’m assuming your Windows install already has Powershell 2, IIS 7, and .Net 4. It will do if you are running Windows 7/Windows Server 2008 R2. If not, you can download Powershell 2 from http://support.microsoft.com/kb/968929. If you are miffed about the lack of support for IIS6, let me know and I will fast track adding that feature.

Step One – Get PowerUp

Browse over to https://github.com/affinityid/powerup and download the latest version (or Git clone if you think you might be in the mood to fork).  You can save this directory anywhere on your machine.

Step Two – Install IIS Powershell Snapin

The web deployment module within PowerUp currently assumes you have this installed. Head to http://learn.iis.net/page.aspx/429/installing-the-iis-70-powershell-snap-in/ to get this on your machine.

Step Three – Build and Deploy

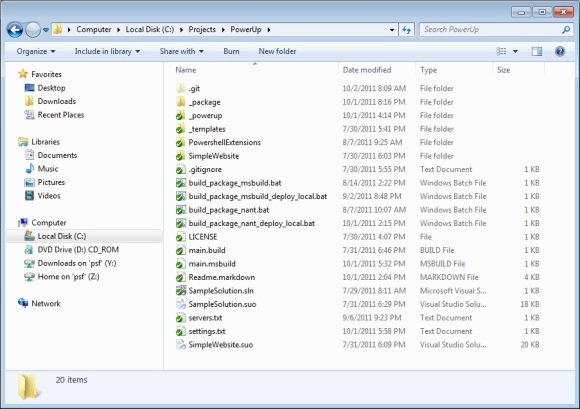
Head to where you downloaded/cloned PowerUp, for example, as below.

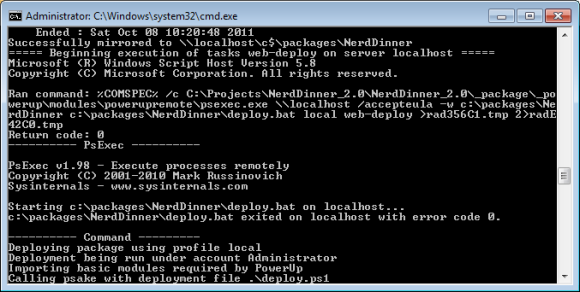
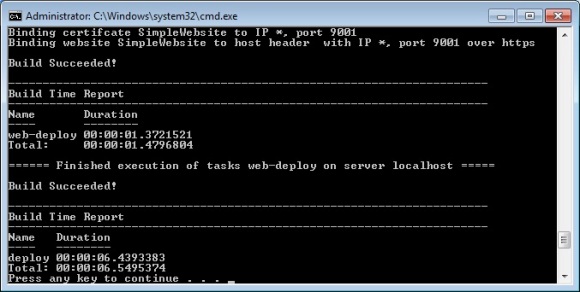
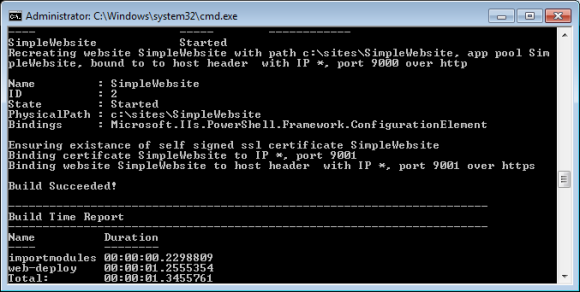
Now double click on build_package_nant_deploy_local.bat. You should see quite a lot of console output, ending with something that looks like this:

PowerUp has now deployed a simple website to your local IIS instance.

To check it out, open a browser and go to http://localhost:9000. You should see something like this:

Yep, it really is that easy. With the help of just a few basic Windows components, PowerUp has built and deployed a fully functioning Asp.Net website.

Other Posts

Next (PowerUp Quickstart – An Rundown)

Previous (The Glossy PowerUp Sales Brochure)

The PowerUp Series

The PowerUp Glossy Sales Brochure

Here is a quick run down of what PowerUp is, and what its good point are.

The Vacuous Sales Pitch

Powerup is a build and deployment framework utilizing Nant, MSBuild, Powershell and Psake. It makes the automation of build and deployments possible for anyone – not just for new projects, but also legacy manual builds. It is designed quickly allow easy things (ie there are lots of sensible defaults), but flexible enough to be extended to do much harder things (the architecture is completely open for extension).

PowerUp doesn’t require you to invest in “its way”. The PowerUp way is probably what you are doing already, but with some structure and helpers to make it fully automated.

The Concrete Details

Here is what PowerUp actually does.

First of all, it helps you easily create a simple package of your solution. That is, it provides Nant and MSBuild files that compile your solution (if needed) then copy all the required files into one location. It then zips this all up.

Secondly, it provides the mechanisms to script your deployments. This includes:

  • A scheme for storing your environment specific settings in a single plain text file, which is then substituted into templated config files. No more multiple copies of your web.config files for each environment. Or worse, having to use VS2010 config substitutions.
  • Lots of Powershell modules to perform common deployment tasks. This includes configuring IIS, copying files and deploying Umbraco Courier revisions (with many, many more planned).
  • A framework that allows you to seamlessly distribute your deployment over any combination of remote servers. Specifically, this means a way of selectively running your psake deploy tasks on remote machines.
It integrates easily into CI (Bamboo and Teamcity already tested).
It doesn’t limit what you can do during deployment – any Powershell is allowed.
If you don’t like how something is done, you can change it. This includes how the settings are read, how tasks are executed remotely.
If you want to use msdeploy, you can
If you want to build your package in something other than Nant and MSBuild, that is fine as well

Closing Pitch

The central theme is: With PowerUp, you will be able to do almost everything out of the box without having to think. But when you want to get stuck in and change things, you will be able to.

Other Posts

Next (PowerUp Quickstart)

The PowerUp Series

Building PowerUp – the Behind the Scenes “Making Of” Mini-Series

Welcome. Stick Around If You Want To Automate Your Deployments

Until recently, I was working at BBC Worldwide (working on such websites as Top Gear). Like any big development house, we produced a lot of software, and had a fairly sizable chunk of infrastructure to support these systems.

I learnt an important lesson during these years – software should be built, tested and deployed automatically. To do this manually invites chaos, uncertainty, fear and distraction into our working lives. Its frustrating and it deserves to be left in the past.

PowerUp is my attempt to bake the lessons I have learnt about automated deployments into a neat, well organised, complete (but extensible) nugget of goodness. I hope many people find it to be useful and empowering. I also hope at least a few are inspired enough to join in and contribute.

Now then….

I’m going to unroll what myself and the folks at Affinity ID have done as a series of blog posts.

Of course PowerUp is ready to use now, you dont need to wait. For the impatient, please visit the PowerUp GitHub Repository and follow the current quickstart guide.

Upcoming posts

These are the topics I hope to cover. I’m going to tackle these one every fews days, roughly top to bottom (pending any demand otherwise). They vary between the how and the why, and also little focussed snippets of particular technical problems we solved. Each will be made into a hyperlink when the post is up.

Using PowerUp

The Design Of PowerUp
  • Creating a Well Organise Build, With Nant or MSBuild
  • The Challenge Of Configuration Files Requiring Different Settings Per Environment
  • Choosing a Deployment Scripting Language For Windows
  • Using PSake To Structure Deployments
  • Configuring Powershell to Run .Net 4 Cmdlets, and Other Challenges
  • Running PSake Tasks Remotely With Both PSExec and Powershell Remoting
  • Executing PSExec Within Powershell
  • How To Enable Powershell Remoting With A Single Script
  • Powershell Integration With Continuous Integration
  • Deploying Umbraco with Courier and Powershell
  • File Copying In Powershell – Why Robocopy Still Holds Its Own
  • Basic IIS 7 Configuration In Powershell
  • SSL Certificate Configuration In Powershell
  • Unit Testing Powershell Scripts
  • Conspicuously Unused Tools – MSDeploy, Visual Studio Configuration Transformations
  • The Future Of PowerUp

JamSpoonUI – a sneak peek

I couldn’t help myself… here’s a bit of crystal ball gazing into what I imagine the JamSpoonUI user experience will be like.

Basics of JamSpoonUI and the use of JamSpoons

Let’s assume that I have downloaded the JamSpoonUI project (I think it will be written in RoR) on OSX and have configured a website locally to run from port 5000.

Once the browser is open on http://localhost:5000, I will be presented with the generic JamSpoonUI for resource management.

The only relevant part of the UI at this point will be a textbox in which to type the root URL of the JamSpoon instance to be used. This could be local, or somewhere else on the network, or even the Internet. Let’s say it’s on the Internet, and the URL is http://admin.davescars.com. Residing at this URL will be an installed and configured JamSpoon, adhering the standard JamSpoon REST interface. For arguments sake, let’s assume it is the CouchDB JamSpoon, running on Linux, configured to read and write to a specific CouchDB instance on the same machine.

So there are two key concepts so far. One is that the JamSpoonUI has very few runtime dependencies or configuration concerns. The user simply types in a URL to a JamSpoon. The second point is that the JamSpoon itself IS highly configured. The code running at this URL, although it simply implements the common JamSpoon REST interface, is very tied in with the JamJar it is designed to be used with – in this case CouchDB. Not only this, but it is configured to run against a very particular CouchDB instance. If there where two CouchDB instances on this machine to administer, this would mean two CouchDB JamSpoon web sites. (when I say website I of course just mean the general term for something responding at a URL. It is a REST web service).

Navigating directories of resources made available by JamSpoons

What next? Well, now the JamSpoonUI knows where to find the JamSpoon, it can start to display the resources presented by it.

So the first thing that will happen is that a GET request will be sent to http://admin.davescars.com/ (ie the root document). The JamSpoon REST spec will dictate that at the root location should be a list (in JSON of course) of all the resource lists available. That sounds a bit confusing, so an example.

For davescars, some sensible resource lists might be:

usedcars
dealers
contactdetails
newcarsunder10000
newcarsover10000

So at the root URL will be a JSON list containing tuples of these descriptions and the URL at which to find each list. So for example “dealers” could have the URL http://admin.davescars.com/dealers, or perhaps /lists/dealers. It doesn’t really matter, as long as the root catalogue has the correct URL.

What would JamSpoonUI do with this list? Well I am imagining a navigation pane on the left hand side, that would show the list of resources currently selected. So to begin with it would display the root resource lists I wrote above. The next logical thing would be to click one of these lists, to see what resources they contain. Doing so would simply send an identical GET request as the root to the JamSpoon, but this time for the subpath. So in this case http://admin.davescars.com/dealers.

The JamSpoon could now do one of three things. It could return a list of more lists, or it could return a list of “real documents”, or a list of a mixture of the two. This may sound distinctly like a file explorer interface. Well it is, it’s certainly no accident! The experience would be very similar to navigating a file navigation from a website (such as when you allow directory browsing in IIS).

So that’s nice, I have reinvented files a directories and applied them to a JSON REST service interface. Not exactly revolutionary! But that’s mostly the point, this is all meant to be very, very simple and very, very unsurprising. To see a working example of this kind of thing, have a look at Demis’s ServiceStack JQuery file navigator demo.

Resources displayed as directories and files

So returning to visualising the UI… On the left we have a very familiar looking directory navigation UI, with folders (JSON lists) and files (everything else). This could look like either of the standard file explorer UIs – list or tree. Very familiar.

I will now attempt to address what I think are two obvious questions. Firstly, what happens when the user clicks on a document in the list? Clicking on a directory drills into that directory. Clicking on a document….? (this is exactly the same as asking what happens when you double click on a file in Windows vs double clicking a folder. In the case of Windows, the file opens in an application, usually. What will JamSpoon UI do?). Secondly, given the JamSpoon is returning JSON to represent directories AND documents, how will the UI tell the difference?

Displaying JSON and media resources

To answer the first question, I think it is useful to consider what it is that JamSpoon is working with. Going back to the definition of Jam – JSON and Media, the resources are split into two types. Firstly is JSON – structured resources or resources that are interlinked, meaningful representations of the domain. Documents, perhaps, or more crudely “objects”. Secondly is media – still resources, but not structured. So this is images, or video, or a pdf, for example. But also any other literal content type, such as HTML, or XML or even just plain text. Anything that is not in the representation that JamSpoon expects – JSON. Now J & M are both perfectly legal, they will just be treated differently by the UI.

First I’ll discuss the easy one. This is what happens when a Media resource is clicked. My expectation is that the UI will have a second area to the right of the navigationb- for displaying resources. In this area I think will be placed an iframe, where the browser will simply be passed the URL of the resource.

For example when the URL http://admin.davescars.com/images/fordis clicked on, the UI code will see this is neither a directory nor JSON, and simply pass this URL to the iframe for the browser to render. After that, it’s the browsers job. Seems easy right…?

Now for the trickier case, when the user clicks on a JSON resource. This is the real deal now – what this has all been leading to. The viewing and editing of structured resources. Now anyone who has used any kind of CMS must know where this is heading. What we are talking about is Editing Content.

Why use JSON, and the problems and similarities with CMS templates

The fundamentals of this basically come down to the fact that structured content has to have a few features to be useful. Those features are:

1. Fields. The information in documents needs to be broken down into bits, so the users know what they need to enter.
2. Types. To get information in easily, the UI needs to help the user a bit with what should go into these fields. You know – dates vs rich text etc.

Yep these are the “templates” that are always somewhere in every CMS, constantly reinvented and recycled, even in Sharepoint! Templates reach their ultimate form as columns and tables in the relational databases we all know and love. Now most CMS don’t try and make templates “real” types (ie static types), as this would make adding types really hard, even forcing a recompile. So instead they are often just soft types – things that are looked up by strings with such code as list.finditembyfield(“name”,”john”).setfield(“age”,”23″). Look familiar, jaded CMS users?

So let’s be clear. I hate that shit. I get why it’s like that (I have, after all, written a large portion of a custom CMS that looks exactly like this). But working with a model like this, although allowing a flexible UI, makes writing anything else on top of it a riotous pain in the arse.

So much of a pain, in fact, that I spent literally months at my previous job (as did others) implementing ways to map this template/field/value moosh into statically typed model, then save it to a relational database, with proper tables and everything. This results in a BEAUTIFUL static model to write an MVC web site on top of, but the plumbing tax is cripplingly high.

That, my friends, is why we are dealing
with JSON documents. JSON has the wonderful characteristic that if you want to deserialize that JSON into a static type, you just go ahead and do it. Beautiful model for your MVC, with no tax. (And yes, I know documents have limitations versus relational databases, ORMed into an object model. Thats quite a chunk of the NoSql debate. Needless to say, if you think you need a relational database, you probably need to come back in a few years time. Support for relational models, like I have hinted previously, is HARD).

How best to display and edit JSON – a gentle start

Alright, where was I. Right – what happens when the user clicks on a JSON document. If this was treated as a literal, you would simply get a whole lot of “:”s and “[“s and property/value pairs shown. No good, the user is expecting this information interpreted as a live, editable, comprehensible document as they would in a CMS. How can we achieve this?

Well, as a very first start we can break the JSON into it’s known elements. That is, would could pull property names and property values apart. That would show some nice label/field pairs. Then we could use the natural array hierarchy to show the tree structure of the JSON. That’s getting a bit easier. Then, we could even infer some types, maybe showing numbers, strings and dates differently. But after that… well we are a bit stuck. But that is still quite a bit of progress, and in fact this is what most JSON viewers do.

But viewing is comparatively easy. What if we want to create or update a JSON document? What then? Do we just ask users to start creating fields, but please be very, very careful as we want to pull in these documents to create a website on top of? CMSs don’t do this, they have templates. And that is basically what JamSpoon will have too.

Introducing JSON schemas

Now, let’s be clear. We are NOT talking about a type system here. When I presented this idea to the author of RavenDB (Ayende) he immediately reacted that I was going to try and impose types into an intentionally schema-free NoSql world. If you look at RavenDBs JSON editing interface, you can see that in action. Adding fields to a document means simply typing in the field name and value (both as strings) and hitting save. But as I said earlier, this is not a UI for public consumption!

So we want to have a CMS-style template UI for JSON, without imposing a type system. How is this going to work? Well I’m not exactly sure…but how about using JSON Schema? Not as a strict type system, but as a hint to the UI? An… overlay if you will. A guide, a stencil. Or as I have said before, a JamSpoon Recipe.

But first, a few thoughts as to why I think JSON Schema may work. JSON Schema, in many ways, looks like any other document schema, such as XSD. It simply lists out the names of the properties expected in a JSON doc, their data types, whether the property is required, validation rules. Sounds like a CMS template right? And not only that, it is recursive, so a child element of a schema can be another schema doc. So basically it is a very elegant way of informing the JamSpoonUI what shape a JSON doc should be, filling in the gaps with all the information not in the JSON itself.

So imagine again we click on a JSON resource on the navigation. If that resource is somehow associated with a schema document, the UI (unlike before where it could only show properties/values as simple text boxes) can now present a familiar rich UI, with date pickers, rich text etc based on guidance of what is in the schema. And I should emphasis again, this JSON may be deeply nested with many levels. I expect the UI will show all these levels at once.

Unresolved issue with using JSON Schema

Some questions, I think, pop up immediately about all this.

1. What if the JSON doc does not match the schema doc? Will this just produce and error?
2. How will the relationship between the JSON and the schema be stored?
3. How will the UI handle the relationship between the JSON and media (ie file upload fields)
4. How will the UI handle the relationship between two JSON documents. Ie, could one of the properties of a “car” be a reference to a “dealer”. And if so, how would the JSON schema represent this, and how would the UI show this?
5. What if a document is very large, would you show it all at once? Could there be paging?

Lots of questions, none of which I am going to answer now, as I don’t know! Can’t design it all upfront…. Time will tell, but this design feels right, at least. And one thing that feels very tidy is that the JSON Schema documents are of course JSON resources themselves, so
can be stored right in the JamJar! And can be viewed right in the JamSpoonUI! Their schema doc will simply be the JSON Schema schema (thankfully already created by the author of the spec). That just HAS to work right? It’s just too nifty not too.

Designating the difference between JSON documents and directories

Now to return to a different topic – knowing the difference between directories and files. Just to clarify this issue a bit further, here is an example. Say the UI requests the resource at http://admin.davescars.com/dealers/auckland. What may come back is a JSON document with a list of 3 urls of the names of Auckland dealers. Now this could actually be a document in the CouchDB database. “Dealers” could actually be a CouchDB index, with Auckland as one of the documents. But to the JamSpoonUI, it could also look exactly like a directory listing. How does it know what to do? One answer would be to force a convention – everything more than one deep in an URL is a document. While this may fit some JamJars just fine (such as AmazonS3 which I think disallows buckets inside buckets), it seems to me a painful restriction for others.

What seems better to me is to special case the directory JSON. That is, place a special element in the JSON of the response, or even add an http header value (maybe the content type). Either way, put something in the response to signal to the UI that this is a directory listing, and shown it as such.

I believe this is justified as a design because of the following reasons:
1. It would be wrong to alter any real documents coming back from the JamJars (say tagging it as a non-directories), as that would misrepresent what is actually being stored.
2. Some resources coming back from the JamJars will actually be media (ie literal resources such as images) and can’t be altered anyway
3. In almost all circumstances, directories will be “fabricated” by the JamSpoons – ie they won’t actually exist as an actual read/write document anywhere in the JamJar. For example, I expect RavenDB indexes to be presented as directories, which the JamSpoon will then remap into a format understandable by JamSpoonUI
4. The format of the JSON for directories will have to be in a very specific format anyway (descriptions, urls), so adding a single item to say “this is a directory” is hardly a huge overhead.

Conclusion

So there’s the first walkthrough. Hopefully it gives a taste of what I am hoping for, and some ideas of how to achieve it.

The humble beginnings of JamSpoon – freeing resources within Umbraco

The goals of JamSpoon are a little ambitious, but like anything it must all begin somewhere. Being a kanban kind of guy, I want to start with something that will provide value immediately, that will go live and hopefully get real user feedback. As such, I have decided to place any UI work on the backburner (UIs are haaard), and instead start by evolving the design of what JamSpoons (the components that shuffles Jam to and from JamJars) should do.

To get this going, I am going to work from a real story that came up at my last job.

That is:
As an editor, I want to be able use the editing features of umbraco, but have the published content stored in ravendb, so that the devs can easily create my website in asp.net mvc.

In truth, the ravendb bit is a tad fabricated (noone cared where the content ended up, so long as it was accessible outside umbraco), but I thought it more useful to start with a very specific storage location, and generalise later. This story (well epic really – it will be broken down below) captures the starting point of my motivation for this whole project. Often we want to create websites ourselves, in whatever technology suits us, but we don’t want to have to create the UI for editing content on that site. That is, by rejecting the straightjacket limitations of a CMS in exchange for the freedom of using any technologies we like, we throw the baby out with the bathwater and lose all that content management infrastructure. This story is about having the umbraco CMS cake but being able to eat the asp.net mvc cake too.

So how will this mixed metaphor miracle materialise? What I am expecting to be able to do is hook into the publishing events within umbraco so that when content is published, the XML document umbraco uses is translated into the JSON documents RavenDB uses. This JSON is then sent off to RavenDB to store. The specifics of this functionality will emerge as I work through the following more specific stories (derived from the epic above):

1. As an editor, I want new documents published in Umbraco to be also stored in RavenDB
2. As an editor, I want documents unpublished from Umbraco to be removed from RavenDB
3. As an editor, I want new media (images, video etc) published from Umbraco to be also stored in RavenDB
4. As an editor, I want existing documents published in Umbraco to be updated in RavenDB
5. As an editor, I want existing media published in Umbraco to be updated in RavenDB
6. As an editor, I want the resulting documents in RavenDB to be useable in an Asp.Net MVC website

That covers the basic CRUD cases. But I am also interested in capturing the publishing lifecycle of content often found in CMSs (where version history is maintained, deletion is through unpublishing and content can be in a preview state). I expect the code will support both CRUD and publishing lifecycle models.

That is:

1. As an editor, I want the previous version of a document to be also retained in ravendb when a document is changed in umbraco
2. As an editor, I want to retain the previous versions of a document in ravendb when a document is unpublished in umbraco
3. As an editor, I want a distinct version of a document to be also stored in ravendb when a document is published for preview in umbraco
4. As an editor, I want a distinct version of a document to be also stored in ravendb when a document is saved, but not published in umbraco

(notice there is no mention of media here, as it is uncommon for versioned history of media resources to be maintained in CMSs).

Hopefully the usefulness of these stories shine out. That is, with these stories implemented, you could easily create a website in asp.net mvc, monorail, openrasta… anything, with content you are editing within umbraco. This independence of the resources from the tool used to manage them is the essence of the JamSpoon philosophy. Hopefully this small tool will demonstrate that philosophy and prove a few of the key concepts.

My next few posts will focus on the implementation of this. But as a teaser, here is how we could get from this starting point, to creating the full JamSpoon ecosystem.

1. Still within umbraco, create another module (similar to the ravendb one) that creates a copy of the content to the local file system
2. Just for umbraco still, refactor these two modules (ravendb and local file system) to sit behind a common interface, that captures the abstracted essence of what is being published out of umbraco
3. Refactor again, so that these modules sit behind a rest interface and are called via http (these will then be the first two JamSpoons – one for ravendb and one for local file system)
4. Now we are operating over http, implement the mongodb JamSpoon, which is running under Linux. At this point, we will have content published from umbraco being stored in mongodb. At this point we have now liberated the the resources not just from umbraco, but .net and windows.
5. Port the glue code that now lives in the umbraco module (that code that calls the JamSpoons’ rest api over http) to a completely different CMS, say Drupal! If this is possible, this means we can now publish drupal content to, for example ravendb, possibly without a single change to any of the existing JamSpoons…
6. Implement some more JamSpoons, for example AmazonS3, or even SVN…
7. Port the calling of these spoons to some more CMSs, say WordPress…
8. As patience permits port to various CMSs such as Joomla, Sitefinity, Expression Engine, Sharepoint(!), Orchard and so on
9. Again, as patience permits, implement a multitude of JamSpoons, such as Odata, Gdata, Memcached, Reddis, Couchdb – anything that allows schema-free storage of files like resources.
10. Possibly, even a JamSpoon that takes the Jam and rehydrates into objects and stores it in a schematic relational database using NHibernate. Sounds mad? Topgear does exactly this right now, so it’s possible….!

If this was all done, you could pick any CMS you wanted, and have it distribute the content to pretty much any storage location you liked, all via http over a uniform rest interface all the JamSpoons adhere to.

I won’t pretend these solutions wont have a few weaknesses, ie:

1. The documents will be duplicated in the CMSs and JamJars, with all the issues that involves (eg if someone edits the docs in ravendb, they will get overridden in the next umbraco publish)
2. The editor may get confused and frustrated that some things possible in the CMS they are using will have no effect (eg creating views in umbraco wont affect the asp.net website running on top of ravendb, for example).

These reasons are the motivations for ultimately creating the new JamSpoon UI, with all the Json Schema and workflow features I have mentioned before. But I think that needs to wait until I have experienced other CMSs, and seen what it is about them that should be incorporated in the JamSpoon UI (and, almost as importantly what shouldn’t be). The important point is that this UI will transparently be able to sit on top of any URL that implements the uniform JamSpoon rest interface. So whether you are working with couch or local files, the UI will work the same and look the same. The UI code (just like the umbraco/drupal/sharepoint code) will, in fact, have no clue what ultimately lurks behind that JamSpoon rest URL.

So with the creation of the JamSpoon UI, the CMSs could be left out of the equation all together. This UI would also provide a great multipurpose tool for viewing and administering the contents of the JamJars (raven, amazon s3, reddis, memcached etc) that could be much more convenient than what is provided natively by those products.

Having control of this UI opens up all sorts of other enticing possibilities, but I am definitely going to leave that for another time.

Thanks for reading so far, look out for more once I start coding.

Questions are welcome. I promise future posts will be a little easier on the eye (you know, headings and diagrams and things), once I return to civilisation….

The Psychological Case For Clean Code

This is a little bit of philosophising that came out of a (misunderstood, as it happens) request by Marcel Du Preez for a list of things that characterise clean code. See what you think.

The Psychological Case For Clean Code

The following is how working on clean code makes programmers feel, and as such, for our own sakes, why we all should give a damn about it.

Writing code is a creative process, we feel the code itself represents who we are as professionals and as people. We judge ourselves and others by it, just as a musician is judged by the quality of the music they perform. It matters.

So, here is how we feel when we work with clean code:

Productive
We spend very little time debugging, deciphering code or reworking badly written classes. When we start a new feature, we can work on it straight away rather than have to re-steady the foundations all the time. Estimation is not daunting – we know even complex features will be smooth, predictable.

Clear headed
The code speaks to us, takes it easy on us. We only need to understand a few things at a time, not massively interweaved concepts. Abstractions are consistent, tangible. We know exactly what we are working on at any one time, we can explain it to someone else in a few sentences.

Motivated
We like working in the code. Progress is always being made. Things actually get easier as time goes on, compelling us to stick with it, even under pressure, so we can reap the rewards.

Confident
We are not scared to make changes. We are bold, feeling free to refactor, rip everything apart. We know if something goes wrong, we’ll be the first to know, and no-one will get hurt.

Competent
We understand the code, even when it achieves extremely complex things. We are not confused, the code is learnable. We feel like a better programmers having worked on it.

Ambitious
We sense the code is already powerful, well thought out. We have clear ideas about how we can make it even more capable. The potential is so ripe, that out goals grow. We can’t help say yes to features, because we can see so much is possible.

Proud
It is an honour to work on the code. We want it on our CVs. We blog about it, we are happy to publish code snippits. When new members join the team, we can’t wait to show them the best bits.

Vigilant
We hate seeing the code spoilt – we take issue when bad code is committed. We refactor when new code isn’t as good as what is already there. We believe the code deserves to get better every day. Hacks are just revolting. We reject bad ideas that don’t make the grade.

Calm
Nothing in the code scares us. It does what it is supposed to. Deadlines are not overwhelming, as we know strange bugs will not appear at the last minute.

Open minded
We are not afraid of someone coming in with criticism, new ideas. The code doesn’t require a defensive attitude to maintain team members’ self esteem, it can stand it. Anyone can see it is good already, any way to make it better is welcome.

To wrap it all up, clean code makes programmers feel in the flow, in control. For businesses that rely on software, this can have more effect than most people even dare to imagine.

JamSpoon!

First of all, I am writing this on my iPhone on a bumpy road in the middle of Laos. So don’t expect this to look very nice… I have already lost some of my edits due to silly iPhone carry-on, so this is now a exercise in pure stubborness.

I have been designing in my head my Json CMS thing that I was going to call Spatula. But now the concepts and ideas are much clearer to me, so a rename is in order – JamSpoon it is! (name to be explained soon). In a nut-shell it will combine a rich UI for editing Json documents with an extensible REST based architecture for storing these documents on the web. More detail needed? Come on then, let’s go.

First of, I think the best description for what this system will be is an RMS. That stands for Resource Management System. By Resource, I mean resource in the web sense – ie everything that sits at the end of a URL. It’s therefore also a resource in the REST sense, and can be manipulated in the normal restful way.

So this system will provide the UI and mechanisms for managing web resources. It’s no coincidence that RMS sounds a bit like CMS. This is because one of my goals is to provide certain features that have become common place in most CMS systems (such as templates, edit/publish workflows, media management). But at the same time, I want to step away from the usual focus of CMS systems, which is to provide an end to end means for managing web sites. Web site creation is a much more specific and detailed set of functions (sometimes with in-page content editing, seo, HTML templating engines etc), of which resource management (editing text, uploading images, publishing blog posts) is often nestled into in an inextricable way. JamSpoon will only do resource management. Nothing else.

Why is this useful? See my previous blog post “CM bloody S” for some background, and my “Spatula” post for some more details on how I have got to this point (can’t link! On iPhone!). But basically it comes down to the fact l often content driven sites/services are tormented by the need for basic content management, but don’t need web site management. Often the web site
either exists already, or is developed in another framework (asp.net, ruby on rails) that has nothing to do with a CMS. All they need is a mechanism for their model to be populated.

Another angle of use is coming from the document/NoSQL world. Typically these systems provide a schema-free storage mechanism for holding web resources (usually in JSON). Having a nice UI to edit these documents would be very handy, and would often remove the need to write a custom UI for every particular purpose. These two usages seem like pretty good motivators to me, and should find an audience. Hopefully.

To begin explaining the design, I’ll start with the name. JamSpoon will be a system for pushing (spooning) around JSON documents (for textual resources) and binary resources. Ie JSON And Media – Jam. It’s a catchy name, I’m happy. There are 2 main aspects to the design which I think are the key elements. They are how the UI is configured to to edit JSON documents with a given schema (called Jam Recipes), and then how these documents are then stored on the web (Jam Spoons). Firstly, Jam Recipes. These are roughly equivalent to templates in CMSs, or schema for relational models. So this is where guidance can be given about how the UI should lie over a JSON document. I should emphasis this is not schema in the strict sense – the document being edited might have all sorts of fields not mentioned in the recipe. That’s fine, the UI will just ignore those bits.

The format of recipes will be itself in JSON. Specifically, JSON schema documents (no link sorry, google it). This format is very useful, as it allows validation information, nesting, arrays, and other custom fields. Being JSON, the same UI will be used to edit the recipes as the documents these recipes describe. Nice and tidy. I’d love to give an example in JSON Schema, but can’t easily on the phone. But it words, a recipe would be something like:

Car story
– Title (string < 100 chars, required)
– Body text (string, required)
– Array of photos
— Image (binary resource, required)
— Alt text

So this describes how a UI can be constructed such that a JSON document of this form can be edited. Hopefully users of Raven/Mongo/Couch might find this useful. So imagine a UI in which a hierarchy of forms let you create car stories, filling in the text, creating images underneath. Very standard CMS stuff. When you are finished, you can save it, and this resource is persisted somewhere. I'm thinking of supporting 2 modes: CRUD for normal admin type interfaces (where once saved, the resource exists, deletion is possible, no change history is maintained) and Publishing Workflow (where resources are in draft state until published, can't be deleted (only unpublished), and full change history is maintained). These are two very common patterns, each with a lot of uses. The Jam Recipe will state which mode a document should edited. Sounds good to me anyway. There is lots more too it (specifically how links between document could be displayed, and how displaying lists of documents/searching would be handled) but I won't get into it here.

Time to move onto the persistence mechanism. My idea is to use the analogy of spooning. Not in a sexy way, in a slurping stuff around way :). Jam (the JSON And Media) will come from the UI and sent to Spoons via a uniform REST interface. For eg, if Car Story 12 is to be deleted, the http request DELETE /carstory/1 would be sent. So The main UI website would contain no code to directly store anything, it would only be configured to point to a Restful end point over http. The expectation is that these end points would act as an adapter, translating these standardised rest requests into whatever form required to store the Jam. The external systems that actually store the Jam will be called JamJars, to emphasis that's where they ultimately live. Examples I can think of right now:

RavenJamSpoon: translates calls into calls to Raven (either over http again, or the clientAPI)
MongoJamSpoon: translates calls into the Mongo Api
CouchJamSpoon: ditto
LocalFileJamSpoon: translates calls into local file system operations
AmazonS3Spoon: translates calls to the Amazon rest Api for objects/buckets Cassandra, MySql, Memcached(!), WordPress, Umbraco would all be theoretically possible…

The point here is that because this is happening over a rest interface, this spooning can be done in any technology, an any platform. All that the spoons need to do is implement the uniform http interface the UI code is expecting, and translate it into calls in an external system however they see fit. Many spoons would be very simple, some more complex. Not sure which yet!

As an interesting side effect, this uniform interface could also be used to access these documents outside of JamSpoon, if the raw format is hard to work with. Good ones (like Raven) I would expect would just be uses as is, ie through the Raven rest interface.

I guess that's about it. I think the UI part will be done in a Ruby framework (Rails prob) and I'll start with the RavenDb spoon, in C#. Just to prove the neutrality of it all. Well I will start, as soon as the old tropical holiday is over…

SharpThreads, Part 1

Graphics programming is the ultimate hell-fun type of programming.

Reasons: Its mathematical (so it makes me feel smart), and also is very functional and testable and neat. When I was young, graphics programming was all I did – so it taps into my very deepest instincts. Put it this way – when I was 11, I wasn’t coding up analytics module. I was making a freakin spinning sphere and a colony life sim thing!

So to intoduce this project, here is a link to the original cloth app I developed in 2004. In C++, and OpenGL, it was for a university paper:

Have a go, right click and play around. I think its pretty neat and the maths behind it is quite sound. Here is my original report, if you want to delve into the theory and practicalities involved.

Now I shall port it to WPF. Just so I learn some more WPF (for my potential new job, hopefully, all things going well), and also because my life is all web these days and I’m losing my mojo. And also, come on, SharpThreads is a genius name.